Showing posts with label DIY Y CRAFTS. Show all posts

In Christmas Activities for the kids Christmas Crafting DIY Y CRAFTS Manualidades Manualidades Navidenas Tarjetas Navideñas

Manualidades Navideñas para niños/ Chrismas Crafting with the Kids

by: Denni Ramirez
Tarjetas Navideñas/Christmas Cards
Esta es una actividad que mantendrá a tus pequeños por horas, ya que ellos querrán hacer una tarjetita para todas las personas que quieren. Con esta actividad simplemente deja que su imaginación cree cada detalle, no hay forma correcta o incorrecta de crear cada tarjetita, es una forma de que ellos vean que pueden crear un lindo detalle para otra persona con sus propias manitos.

This is an activity that will keep your little ones entertain for a couple of hours, since they are going to want to make a Christmas card for everyone they love. With this activity just let their imagination create each card to their taste. There is no right or wrong way, just a way for them to see they can create beautiful things as gifts with their own hands. 
Para esta actividad vas a necesitar papel cartulina neutro y papel de manualidades de diferentes diseños, Tijeras, pegamento, limpia pipas brillante (por preferencia), algodón, Marcadores y cualquier otro detalle que quieras pegar.

For This activity you are going to need a neutral cardboard and scrap booking paper in all kinds of colors and designs, scissors, glue, shiney pipe cleaner (preferably), cotton balls, markers, and any other thing you would want to glue unto the cards.
¿Acaso no están lindas las tarjetitas?
Aren't they so cute?


Read More

Share Tweet Pin It +1

0 Comments

In DIY Y CRAFTS Easy Santa Claus Craft Manualidad de Papa Noel para niños.

Manualidad de Papa Noel/Santa Claus Craft

Papa Noel/Santa Claus
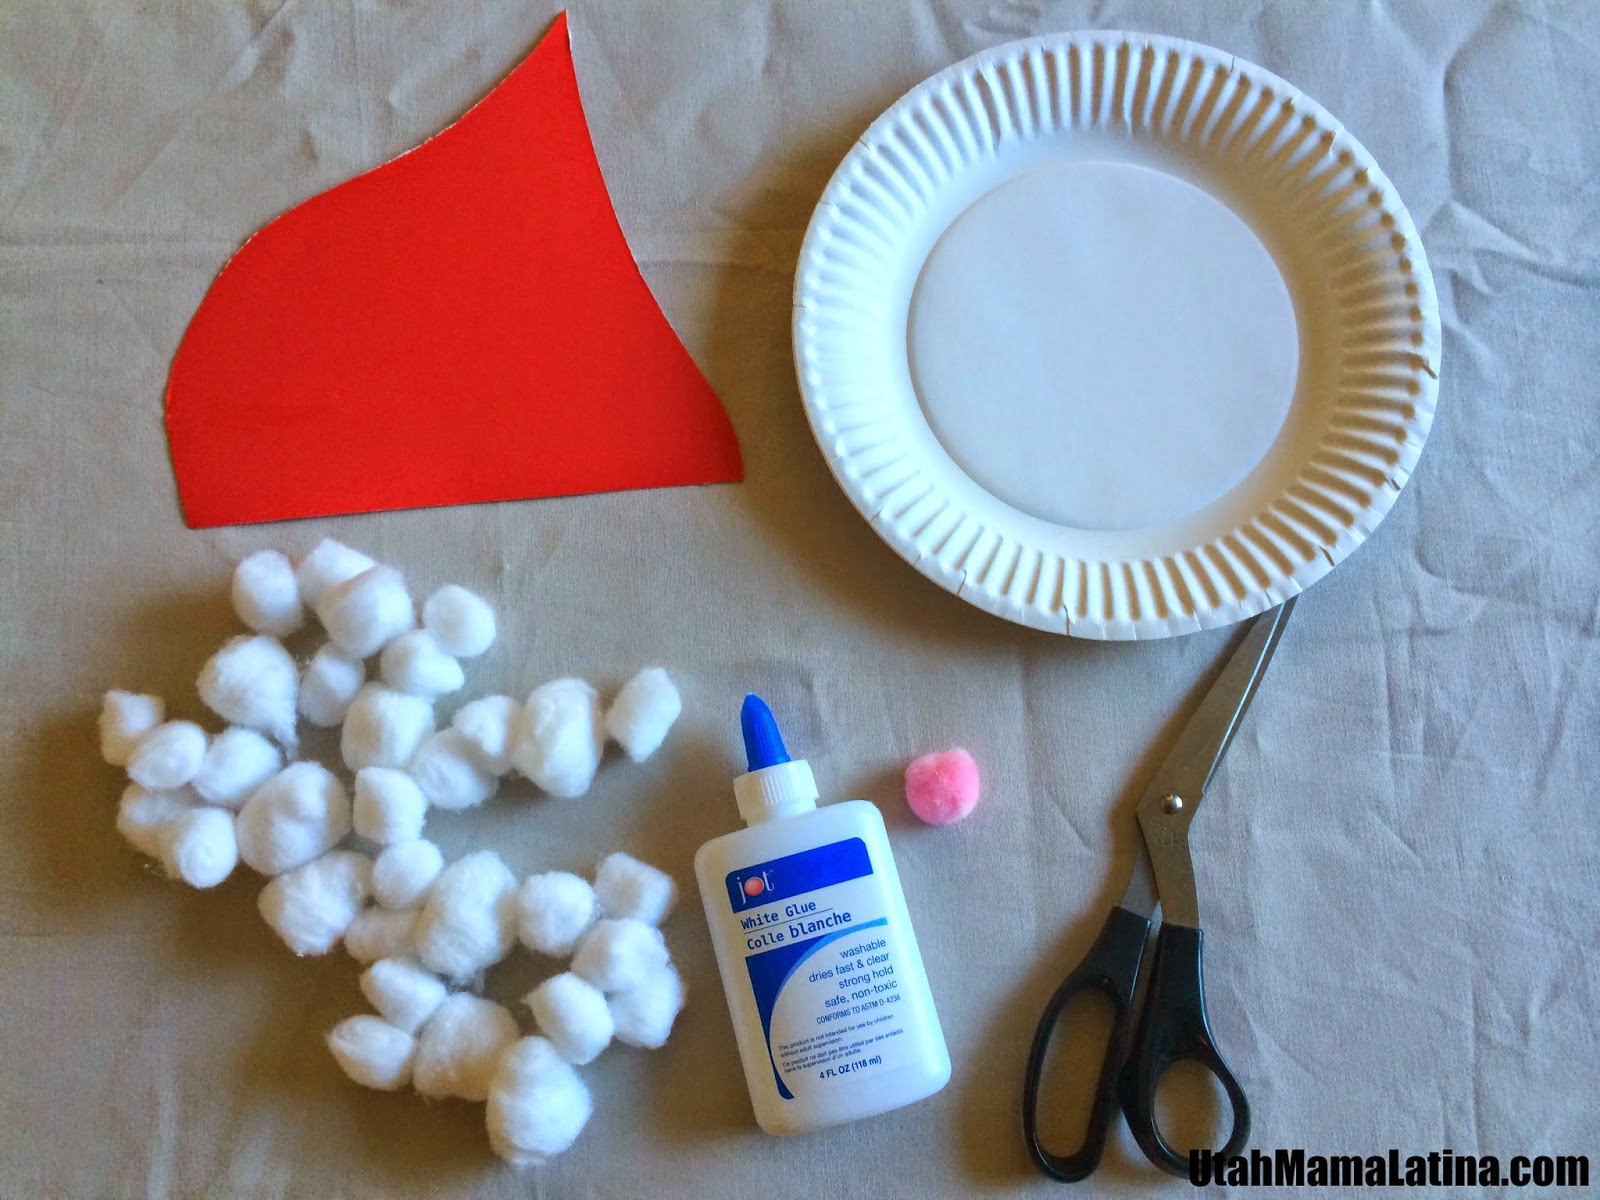
Vas a necesitar un plato blanco, algodón, pegamento, tijeras, un pompón tono rosita, un marcador negro y una cartulina o papel rojo.
For this activity you are going to need a white plate, cotton balls, glue, scissors, a pink felt ball, a black marker and a cardboard or red paper. 

Read More

Share Tweet Pin It +1

0 Comments

In DIY Y CRAFTS Spring Wreath

Spring Wreath

By: Norma Juarez
I am so excited that Spring is right around the corner! The gloomy weather is starting to weigh me down and I'm itching to add some color to the outside of my home. I can almost smell the scent of freshly cut lawn.....as the snow falls gracefully outside my window. Patience is a virtue I do NOT have!
The month of March in our home is super busy as 4 out of the 7 members of the family celebrate birthdays. We are so cake and ice creamed out by the time the April birthday arrives. In light of this insanity, I figured I'd better squeeze out a small and simple project. I found this idea on Pinterest, (I know of all places). Here is the link to the original post.


                         Supplies (All purchased at Hobby Lobby on sale):

Paper Umbrella
Flowers (various sizes and colors)
Ribbon

There really is not much to it. I began with the taller branches towards the back and added the shorter flowers in the front. I also added a pinwheel and butterfly. You gather the umbrella super tight and then add a bow with a ribbon.


And there you have it folks! Super easy and cute!


Here is a wider shot on the pantry door. I love the burst of yellow!


If you make one, please share it here on Utah Mama Latina. We'd love to see them. The amount of variation in this project is immeasurable!


Don't forget to visit my site: www.creationsbynorma.wordpress.com


Read More

Share Tweet Pin It +1

0 Comments

In DIY Y CRAFTS Valentine Day valentine wreath

Easy and Inexpensive Valentine Wreath

Easy and Inexpensive Valentine Wreath
By: Norma Juarez

Hello! Today I am going to share with you a super easy and inexpensive wreath for Valentine's. I found the idea on Pinterest and fell in love with the ease and high on the cuteness scale. The original post is from Brown Sugar Toast and you can find it here. It's one of those "why didn't I think of it" idea.


I told you it was cute! Here is the breakdown on supplies:
  Plus ribbon.

I purchased the hearts and ribbon from the Dollar Tree (DT) and the cardboard frame was generously "donated" from one of my girls' old science project poster. My sweet husband helped me cut the cardboard 13" across and 3" from the edge to make the center square.


 Once you've got your frame ready, time to add your hearts with a dab of hot glue. I started doing the outer edges first and then filling in. I did a red and pink pattern and then cray-cray pattern filling all the yellow spots (cardboard). Oh and I forgot to add the ribbon BEFORE the hearts and had to remove some around to do that important step. So, remember, ribbon first, then hearts.


Here is a pic of the finished product again. I hooked it to the black mirror and it added so much more to the valentine display.

 
Friends have a happy and blessed Valentine's Day! Let's make everyday better for others by showing how much we love and appreciate them all year long.
Don't forget to visit me on my blog: www.creationsbynorma.wordpress.com


Read More

Share Tweet Pin It +1

0 Comments

In actividades para niños DIY Y CRAFTS Pilgrims hat Thanksgiving turkey

Thanksgiving Pilgrim Hat

By: Norma Juarez


Hey all! Happy Thursday, the one week mark that is the beginning of Holiday fun! We will be hosting Thanksgiving dinner at our home this year.  I was in search of cute little crafts to entertain the kiddos. I found this fun idea on Lil Luna and thought it would be perfect. They are little Pilgrim hat crayon holders.


Here are the items you need to complete your own:

  • Black paper cups ( I bought mine at Hobby Lobby)
  • Black cardstock
  • Ribbon, ric rac
  • Hot glue gun w/ glue sticks
  • Button
  • Small paper square 


Step 1: Trace your circle on black cardstock


Step 2: Cut out the bottom of the cup


Step 3: Hot glue your ribbon and/or ric rac. Then hot glue the cup to the circle.


So fun and easy! Ellie wanted to make her own and here she is showing it off. Of course, I did all the dangerous steps for her (i.e. knife, glue gun, etc.).


Here is another shot of mine. I was also thinking that you can add other fun items such as popcorn, peanuts, candy, chocolate covered pretzels, etc. You will need to add shredded paper in the cup to elevate the crayons. Fun, easy, and inexpensive. All you need to add are the coloring pages and your all set.


 Thank you for hanging in as I know this is a long post! I wish you a Happy Thanksgiving with loved ones. Be sure to let me know if you try any of these projects. I would love to see them.

Remember to come visit me for more projects on www.creationsbynorma.wordpress.com

Read More

Share Tweet Pin It +1

0 Comments

In Disfrazes echos por mama DIY Costumes DIY Y CRAFTS Halloween Costumes

Ideas para Disfrazes echos en casa este Halloween/ DIY Halloween Costumes

Faltan tan solo 7 días para la llegada de Halloween, si eres como yo quizás no tengas el disfraz de tus nenes todavía pero aquí te comparto algunas ideas las cuales son muy fáciles de armar y mas que todo económicas.
Quien no tiene ropa en su casa de tonos blanco y negro, el disfraz de pirata es uno que puedes armar muy fácilmente simplemente amarando una banda negra en la cabezita de tu hijo, quizás una camiza blanca o a lineas como la que mostré en la foto y agregar accesorios como una pulsera de cuero, el gorrito de pirata es algo que lo puedes imprimir por tu compu o simplemente hacer uno de periódico y cortar una figura de calaberita y pegarse la. Como toque muy especial con tu delineador pintarle un bigotito muy pintoresco
En esta foto los únicos dos disfraces que fueron DIY echos por mi fueron los dos de la derecha los cuales están usando mis dos hijas, el de Nerdy girl simplemente fue armado usando masking tape para los tirantes, lentes de plástico, los cuales simplemente usamos el frame y de peinado le hicimos dos monos uno mas alto que el otro tipo chilindrina. El de bailarina, fue muy divertido de arma, el tutu lo hicimos con pedazos de tul amarados a una cinta elástica en los colores de elección de mi hija, uso una camiseta negra y leggings negros, el peinado de bailarina le dio el toque indicado para completar su disfraz.
Este disfraz fue armado en el día de vestirse como su protagonista preferido de un libro, en esta ocasion mi hija eligió vestirse como Hermione Granger del libro Harry Potter, simplemente se puso una camisa blanca, pantalones o falda negra, la capa fue lo único comprado y ya lo teníamos en casa. La corbata fue echa de el material Fieltro/Felt, primero corte la base en tono rojo y uno por uno pegue las lineas amarillas, atrás de la corbata pegue dos cintas largas las cuales use para amarar la corbata al rededor del cuello. Por ultimo como no teníamos una barita usamos un lapicero con una pluma negra que teníamos en casa. Aunque el hacer una barita también hubiera sido muy fácil, simplemente la hubiese echo de cartulina negra con una cinta blanca en la punta. Para terminar el pelo de Hermione simplemente agregue mucho volumen y Hairspray.
Este Disfraz fue echo con pedazos de Fieltro/Felt
La idea con este disfraz era usar el vestido mas bonito que tenia mi hija pegarle cintas flores y poner en su pelo cintas que agregaran el toque de princesa también pinte figuritas al costado de sus hojitos. 
Estos dos son muy fáciles de armar, el de roquera simplemente llama vestir a tu niña de mucho colores neón, amarar su pelito de costado y como toque extra podrías darle un micrófono o simplemente hacer un letrero con marcadores y pegarle en su camisa o vestido el nombre de Rock Star. El de enfermera lo armamos prestándonos el atuendo de enfermera de una amiga, le Hice una etiqueta de Dr. y el nombre de mi niña y por ultimo en su cabeza pusimos una mascaría.


Read More

Share Tweet Pin It +1

0 Comments

In candles DIY Y CRAFTS Fall Haloween

DIY Faux Dripping Candles

By: Norma Juarez
Can you believe Halloween is just 2 short weeks away! In honor of this fun celebration, I wanted to try something fun and different. Browsing on the internet, I found this easy ( why didn't I think of that), tutorial on creating these fun candles.
candle 2
 
I found it on DIY Network's site. They are made out of PVC pipe and hot glue. I tried some with the white but I didn't really like that the "wax" didn't stand out as much so I decided to try it on black and what a difference!
My husband helped me cut the PVC pipe into different lengths and then I spray painted them black.
DSCN2608
Once they were dry, I used my hot glue gun and went crazy!
DSCN2602 DSCN2601
Add some Styrofoam insert to hold the tea-light. I really liked them grouped into threes. You can make super tall ones or super short ones the sky's the limit!
DSCN2618 candle 3
Thanks for stopping by! I would love it if you visited me at www.creationsbynorma.wordpress.com and showed some love by liking the site. Stay tuned for more Halloween fun!

Read More

Share Tweet Pin It +1

0 Comments

In Artesania Coronas Coronas de Halloween Crafting Decoracion para Halloween DIY Crafting DIY Halloween Wreaths DIY Y CRAFTS Halloween Halloween Crafting ideas para coronas de Halloween Wreath

7 Coronas para tu puerta este Halloween

Tengo que admitir que el decorar mi casa para el mes de Otoño es uno de las cosas que mas me gusta hacer. Aquí les comparto 7 ideas de coronas las cuales yo se que les van a encantar.

1. Esta coronita si que esta espeluznante, y al mismo tiempo una idea la cual no toma mucho tiempo de armar

Para mas detalles como armar esta corona visita Katy Clouds

2. Esta me encanta por dos razones, celebra tanto la época de Halloween, pero al mismo tiempo tiene un toque muy parecido a una corona que celebraría también el Día de Los Muertos! ¿Que Piensan?
Para aprender como hacer esta corona visita Hip Hip Halloween

3. Esta Corona fue una de mis preferidas, una idea tan única y tan simple de armar
Para mas detalles como armar esta coronita visita Craft-O-Maniac

4. Siempre he tenido ganas de hacer esta coronita quizás después de ver este tutorial me anime y agregue una corona mas a mi colección de Halloween
Para ver paso a paso como armar esta Corona visita Jade Louise Designs

5. Que idea mas deliciosa! y algo que quizás lo puedas hacer con tus pequeños como una actividad familiar
Para aprender como hacer esta corona visita Blu Embellish

6. ¿Que les parece esta corona? a mi en lo personal me encanto la simplicidad pero al mismo tiempo el Pop de Colores y Texturas es genial 
Para obtener las intrucciones para armar esta corona visita Thirty Days Handmade

7. No podiamos olvidarnos de una coronita de brujita!
Para aprender como armar esta corona visita Reasons to Come Home

Read More

Share Tweet Pin It +1

0 Comments

In diy Canopy. DIY Y CRAFTS Refreshing the backyard canopy remodeling the canopy

Refreshing the Backyard Canopy

Refreshing the Backyard Canopy
by: Norma Juarez

The canopy area in the backyard is where we like to hang out on warm summer evenings. I felt that it needed a bit sprucing up. We have had this bad boy for 2 years now. The fabric part really needs to be replaced. You will probably spot a few areas patched up with duct tape. I pick my battles people!


Here are some pictures when we first bought it in 2012 (original post here):


This is the present:

I moved the rug I had in the home office to the outside. I like how it looks in this space. Furniture wise, nothing. I am hoping to replace the cushions soon.


The biggest change has been the addition of the drop cloth curtains. It is nice to use the space at any time of the day. Ellie loves to close all sides and use that space as her “house”.

If you have been with me for some time, you must know that I will take short cuts anywhere I can. On that note, let me show you how I attached the drapes:


If you squint, you can see I used safety pins to hold them. I simply looped them over the bar and safety pinned them to the length I wanted. Works perfectly!


Something else I am pretty proud of is the chandelier. I found this at the local thrift store for $10.00.


It looked like someone else had tried to give it a new look but never finished. I had to prime first with metal primer and then sprayed it with oil rubbed bronze.


The finishing touch was the addition of some bling I bought at Hobby Lobby. I still need/want to add a few more strands.

Here it is in IMAX theatre style!


Do you like? If you have any questions, please let me know.

Thanks for stopping by,

To find more Projects or DIY ideas visit Norma's Blog at Creations by Norma


Norma xoxoxoxo

Read More

Share Tweet Pin It +1

0 Comments

Search This Blog

Archive

Copyright © 2014 Utah Mamá Latina. Powered by Blogger.